How To Polish Concrete Floors: A Step-By-Step Guide

According to estimates, 15 to 20 percent of the flooring systems installed annually are polished concrete installations. Because of its increased capacity to resist slip and stain-resistant surfaces, concrete polishing is preferred by most property owners for flooring upgrades. Its other advantages include the removal of efflorescence dust.
The polished concrete has a sleek, contemporary appearance, and the procedure can also help with the material's general condition. Although the process is simple, it takes time and physical effort. The surface needs to be cleaned and patched, then smoothed out with multiple passes of an electric grinder. It must be polished to bring out the sheen, then sealed to preserve your work. Although polishing a concrete countertop has certain parallels, this article concentrates on polishing concrete floor surfaces.
STEP-BY-STEP GUIDE ON HOW TO POLISH CONCRETE
A. CLEANING AND SURFACE REPAIR
STEP 1 – Using a bristle brush, soap, and water, clean the entire surface.
Scrub the concrete vigorously with a bristle brush dipped in a bucket of warm water with a standard household cleaner. Clean the area with water, then let it air dry.
- Try only one hydrogen peroxide, ammonia, or trisodium phosphate simultaneously. Don't combine these. Apply the exact cleaning method, but wear safety goggles and gloves. Maintain adequate ventilation in the space.
- Get a bristle brush with a handle in the shape of a push broom to prevent having to work on your hands and knees.
STEP 2 – Check the concrete carefully for hazards and damage.
You can see the concrete more clearly if you first clean the surface. Look for any significant cracks or potential dangers, such as sticking metal. Use temporary marking paint to identify these so you can care for them separately before grinding.
- For instance, before you begin grinding the concrete, a protruding metal reinforced bar's nub must be chipped and cut away. The area must then be rebuilt. If you don't know how to repair this, hire a professional.
STEP 3 – Use concrete filler or patch compound to patch up cracks.
Purchase a caulk-gun-applicable masonry crack filler for cracks up to 0.25 in (0.64 cm) wide. Use your finger or a paint scraper to smooth it out once you've squeezed it into the crack. Select a vinyl concrete fix for larger cracks. Fill the crack with the patch material and level it out with the surface with a trowel.
- Before filling in the cracks, clean out any debris using wire brushes—clear debris with a sweeper.
- Allow the product to cure for the time specified on the container completely. Sweep up any dirt on the floor in the repair area once the filler or patch has dried.
B. USING A GRINDER TO SMOOTH THE SURFACE
STEP 1 – Before renting a grinder, test the concrete using MOHS hardness picks.
Select a typical concrete area, hold it like a pencil, and use the same pressure needed to draw a line on the concrete about 2 inches (5.1 cm) long. Check your skin for scratches. They should be worked down until you reach one that doesn't leave a mark.
- For instance, estimate that the concrete has a MOHS value of 6.5. The more solid the concrete is, the higher the number.
- Purchase a set of MOHS hardness picks from a home center or online.
- The set of grinding discs you hire with a concrete grinder may change depending on whether your concrete is soft (5.5 or lower), medium (6.5), or hard (7.5 or higher).
STEP 2 – Obtain metal-bonded diamond discs for concrete grinder rental.
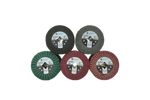
Hardware stores and tool rental companies may rent concrete grinders. The concrete grinding discs included with the grinder should have a grit range of 40 to 3000. Depending on your MOHS testing, if you have the opportunity, pick a set of grinding discs specifically suited to either soft, medium, or tempered concrete.
- Concrete grinding requires a specialized tool; a regular sander is ineffective.
- Metal-bonded diamond discs must be used for grinding. The concrete cannot be adequately ground down with non-diamond discs.
- Make sure the grinder feels secure after hiring it. Find out how it operates, and if possible, ask if you can start it.
- If you're simply dealing with a small concrete surface, this project might not be cost-effective because renting a grinder might cost up to $1000. It can be cheaper to hire a professional.
STEP 3 – Wear safety equipment before handling the grinder.
Wear safety goggles, earplugs, dust masks, and heavy gloves. The grinder is dangerous if misused, noisy, and produces dust. Consider the user's manual another essential piece of safety gear.
- Put on some sturdy work shoes. Wearing non-slip footwear can prevent slip, slide, and fall accidents.
- Wear a safety helmet if you work in an area under construction. In any case, you might wear a helmet.
STEP 4 – Use a 40- or 80-grit disc to grind the surface in half-circle motions.
By the grinder's instructions, attach the disc. Start with a 40-grit grinding disc to eliminate sealants, stains, or other pollutants that won't wash off. Use an 80-grit disc if not. Slowly move the disc back and forth in half circles using the handle. Move slowly and evenly across the surface.
- Work your way out and over to the other corner of the surface, starting at one of its corners.
- Keep in mind that discs with lower grit numbers are coarser. In other words, discs with 40 grit are coarser than those with 80 grit.
- For detailed information on how to use your chosen grinder, go to the product instructions.
STEP 5 – Work your way out and over to the other corner of the surface starting at one of its corners.
Keep in mind that discs with lower grit numbers are coarser. In other words, discs with 40 grit are coarser than those with 80 grit. For detailed information on how to use your chosen grinder, go to the product instructions.
- Consider a square concrete surface from above as an illustration. Make the second pass from the top right to the bottom left corner as if you made the first pass from the top left to the bottom right.
- The scratches made during the previous pass will be polished away by the subsequent pass using a fresh disc. This will also produce fine scratches that will be polished away.
STEP 6 – After the 80-, 200-, or 400-grit grinding pass, apply a densifier.
To the product's instructions, apply a liquid chemical hardener densifier to the entire surface. Concrete sprayed with it is less porous and less likely to develop powdery dust on its surface. According to the MOHS test you conducted, the ideal time to densify the surface depends on the concrete's hardness.
- Apply the densifier after using the 80-grit disc to soft concrete. After the 200-grit pass, use it for medium concrete. Wait until after the 400-grit pass if the concrete is rock-hard.
- Pour the substance into an empty sprayer to apply most densifier brands. Coat the concrete surface with the sprayer's nozzle, then wait for it to dry before moving on.
STEP 7 – Use the 3000-grit disc to make the last pass while grinding.
Working from one corner to the diagonally opposite one, go over the concrete surface as before. Because of the tiny grit on this disc, it will clean the surface.
- If you want, you can jump right to polishing, although using the 3000-grit disc will make the completed concrete appear more high-gloss.
STEP 8 – Clean the concrete surface of all dust and dirt with a Hoover.
Concrete grinding generates dust and debris. Suck up as much material as you can with a wet-dry vacuum after completing the final pass with a grinding disc.
- It would help to use the integrated vacuum some concrete grinders have. When grinding, however, use a wet-dry vacuum.
- Although not often required, vacuuming the surface between disc passes is acceptable. Before buffing the concrete, a single thorough cleaning should be sufficient.
BUFFING AND SURFACE SEALING
STEP 1 – The grinder should be equipped with a burnishing pad before being used on concrete.
Put on a burnishing pad after removing the final grinding disc from your concrete grinder, once more adhering to the product's instructions. Using the same corner-to-corner, half-circle technique, start the grinder and grind the concrete surface using this pad.
- The concrete will be buffed and made noticeably smooth by the burnishing pad.
- When you rent the grinder and the discs, you should also be able to rent a burnishing pad. Rent a low-speed brush-style buffer if you don't have a burnishing pad for your concrete grinder or if the machine doesn't have the right setting.
STEP 2 – Using a roller or sprayer, apply a light layer of concrete sealant.
Decide whether you want a water- or solvent-based concrete sealer, and then apply it as the manufacturer directs. If it needs to be rolled on, fill a paint pan and roll a thin coat over the surface using a paint roller. If it must be sprayed on, fill the approved sprayer as instructed, then coat the concrete with a thin, equal layer.
- Sealants shield concrete against stains like grease, dirt, and others. Additionally, applying a glossy sealant should increase the polished concrete's luster.
- Only apply concrete sealer in dry conditions, and make sure the air temperature is above 50 °F (10 °C) during and for 24 hours following application.
STEP 3 – Within 2-4 hours of the first sealer coat, add a second layer.
Wait at least two hours for the sealer to cure; if it's still tacky to the touch, wait another two (or more) hours. Apply the second coat of sealer using the same rolling or spraying motion as the first. However, work perpendicularly, beginning from a corner close to (rather than across from) where you started the first coat.
- Ensure that the second coat is equally thin and even as the first.
- Allow the second application to dry for 2-4 hours before continuing.
STEP 4 – Burnish the surface once again to emphasize the shiny appearance.
Use the burnishing pad or buffer to go over the sealed surface after the sealer dries. Move perpendicular to the burnishing pass you just completed. Work wholly and slowly, evenly coating the entire surface.
- When you finish this last pass, the concrete should resemble finished stone in terms of sheen and smoothness.
STEP 5 – Do not use the completed surface for at least 24-72 hours.
Let it dry before utilizing the surface or walking on the sealer's last application. The precise duration varies depending on the manufacturer but is often between 24 and 72 hours.
- The polished concrete is finished and prepared for usage after the necessary duration of waiting.
CONCLUSION
Using inferior supplies, particularly for the finishing phase, puts even the concrete at risk of harm. The risk of harming the floor is also present if you gamble with diamond-bonded quality abrasives. It would be best to engage a reputable contractor to assist you with the process if a component isn't entirely clear to you.


