




























How to Remove Scratches from Stainless Steel

To remove scratches from stainless steel, blend them into the existing finish using grain-aligned abrasive strokes rather than trying to erase them entirely. Always test for protective coatings first, diagnose scratch depth with the fingernail test, and work from the finest abrasive that gets the job done.
Learning how to remove scratches from stainless steel starts with understanding what you're working with. Appliances, sinks, and fabricated panels each have unique finishes that respond differently to abrasives. Step 1 prevents the most common DIY failure: sanding a coated appliance.
Test for Protective Coatings and Clear Finishes
Knowing which surface you have is the critical first step. Run quick identity checks on your appliance, sink, or fabricated panel. Inspect the surface under bright light for any uniform sheen, soft texture, or subtle rubbery feel that could indicate a factory coating.
If you're unsure, check the owner's manual or look up the manufacturer's care instructions before using any abrasives. CRITICAL WARNING: If you suspect a fingerprint-resistant or clear-coat finish, stop immediately. Abrasives will permanently damage those surfaces.
Make your go or no-go decision based on what you find:
-
Coated or Unknown: Use minimal abrasion only. Stick to non-abrasive cleaners, warm water, and microfiber cloths.
-
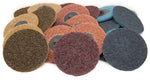
Uncoated Stainless: Controlled abrasive progression is safe. Proceed to restore the grain using specialized abrasive pads.
Shop Surface Conditioning Pads
Prep the Work Area and Map the Grain
Preparing the surface properly prevents trapped grit and grease from embedding into the steel, which causes random swirls, false scratches, and an uneven sheen. Follow these steps to set up your work area before touching an abrasive to the metal.
-
Clean the surface: Wash the area with mild dish soap and warm water using a soft sponge to remove dirt and oils. Rinse thoroughly and dry completely with a clean microfiber cloth.
-
Mask the blend zone: Apply painter's tape at least 2 inches away from the scratch. This defines your feathering area and protects adjacent plastic trim, painted panels, or logos.
-
Set up raking light: Position a bright flashlight at a low angle across the metal. This side lighting reveals the true scratch depth and the directional factory grain.
Success Criteria: The steel is clean, dry, and grease-free. You can clearly see the original grain pattern before starting to abrade.
Map the Stainless Steel Grain Direction
Before sanding or polishing, map the grain direction accurately. Sanding across the grain causes permanent cross-hatch scratches that ruin the metal.
To identify the grain direction fast:
- Clean the surface of all dirt and grease.
- Shine a bright flashlight at a raking angle, nearly flat to the metal.
- Rotate your viewing angle until the faint, microscopic parallel lines appear.
On large appliance doors, the grain is typically consistent across the entire panel. Sinks often vary by plane, with grain changing direction between the flat bottom basin and the vertical walls.
Most household appliances feature a No. 4 finish, a unidirectional satin look. All repair strokes must run precisely parallel to these microscopic lines. Place a small piece of painter's tape near the scratch and draw an arrow indicating the exact stroke direction. This physical guide keeps your hand moving on the correct path.
Success criteria: You can trace a straight, imaginary line that perfectly aligns with the existing factory brush marks. You are ready to diagnose scratch depth.
Diagnose Scratch Severity with the Fingernail Test
Professional metal fabricators always use the least-aggressive repair method first to preserve the factory finish. Starting with an aggressive abrasive can damage a much larger area than the original scratch.
Lightly drag a clean fingernail across the scratch, moving strictly perpendicular to the groove. Categorize the depth to choose your repair track:
-
Does not catch: Light surface scuff or haze. Use a non-abrasive metal polish or an ultra-fine hand pad.
-
Catches slightly: Moderate scratch. Use a surface conditioning pad or a fine wet-sanding progression.
-
Catches hard: Deep scratch. This requires coarse leveling grits and a large blending area, or professional refinishing.
Set a strict stop rule before you begin. If fully erasing a deep scratch requires sanding so deep that you'd alter the texture of the entire appliance panel, a less-visible result may be a better outcome than an over-sanded repair.
Select Your Abrasive Grit and Run a Spot Test
Choose the least aggressive abrasive that can level the scratch while preserving the metal's factory grain and sheen. Always work from finer to coarser — not the reverse.
Starting Grit Guide
- Doesn't catch a fingernail: Use polishing compound, an ultra-fine non-woven pad, or 1000 to 2000 grit wet/dry paper.
- Catches slightly: Use a very fine non-woven pad or 600 to 1000 grit wet/dry paper.
- Catches hard: Use 320 to 600 grit paper only on uncoated stainless steel where you can blend a large area. Otherwise, stop.
Non-Woven Pad to Grit Equivalence
These pad-to-grit conversions are approximate and vary by manufacturer:
- Coarse: approximately P80 to P120
- Medium: approximately P120 to P180
- Fine: approximately P180 to P240
- Very Fine (Maroon): approximately P240 to P360
- Ultra Fine (Gray): approximately P600 to P1000
- Micro Fine (White): approximately P1200 to P1500
The Non-Negotiable Test Protocol
Validate your selected abrasive in a hidden area before touching the visible surface.
- Find a hidden spot, such as the underside of a sink rim or an appliance door's inside edge.
- Execute 10 to 15 light strokes completely parallel to the factory metal grain.
- Wipe the test area clean to remove any slurry or dust.
- Inspect under raking light to verify the scratches are gone and the sheen matches.
For precise manual control on this kind of work, browse our hand pads and surface conditioning collection linked in the Recommended Products section below.
Sand and Blend the Scratch into the Metal Grain
Mastering scratch removal on stainless steel requires a controlled, progressive blending technique. This prevents a reflective dip or halo on appliances, sinks, and fabricated surfaces.
Core Technique Rules
-
Work strictly with the grain: Use long, straight, parallel strokes. Never scrub in circles or back-and-forth arcs.
-
Keep pressure consistent: Use light-to-moderate pressure. Avoid fingertip pressure, which concentrates force and creates deep grooves called tramlines.
-
Feather the blend zone: Lighten your pressure as you move outward, expanding the zone beyond the scratch to avoid a sharp repair rectangle.
Wet-Sanding Protocol
When using wet/dry sandpaper, wrap the paper around a firm sanding block to maintain a flat surface. Keep both the metal and paper wet with clean water to reduce heat and prevent loading. Progressively work finer until the scratch disappears and the texture matches the surrounding area.
Surface Conditioning Pad Protocol
When using non-woven pads, move from aggressive to less aggressive grades to re-establish a uniform grain. Pad colors vary by manufacturer, so follow the grade name and your test results rather than color alone.
When to stop escalating: If the scratch is improving but the panel is starting to change sheen or texture, stop. Switch to finer blending and polishing.
Success criteria: The scratch is gone or reduced to a faint, grain-consistent mark with no cross-grain haze.
Browse the Full Buffing Kits Collection
Blend the Final Finish to Match the Factory Grain
Over-polishing is the most common mistake at this stage. It creates a highly reflective, glossy patch that stands out against the original satin finish. Match the surrounding surface by following these steps:
-
Refine the grain: If you used sandpaper or a medium pad, make a final pass with an ultra-fine abrasive pad to unify the metal's texture.
-
Polish sparingly: Apply a small amount of stainless-appropriate polish to a microfiber cloth. Rub with the grain, feathering your strokes well beyond the scratch boundary.
-
Clean the residue: Wipe away all remaining compound. Check tight spots around handles, seams, and sink corners where dried white residue collects.
-
Protect and blend: Wipe a light, compatible stainless steel protectant over the panel to reduce fingerprint contrast.
Success Criteria: Inspect the steel under raking light. The repair should look uniform with no shiny halos, dark patches, or cross-grain haze.
Pro Tips for Stainless Steel Restoration
-
Commit strictly to the grain direction: Never go across the metal grain, even for a single stroke. Cross-grain scouring creates a permanent, hazy scar that is far more difficult to blend out than the original scratch.
-
Ditch steel wool and household pads: Standard steel wool leaves carbon particles that will rust and contaminate the stainless steel surface. Household green pads introduce random scratches. Use purpose-built, graded abrasives only.
-
Start with the finest abrasive possible: Beginning with a coarse grit out of impatience forces you to refinish an unnecessarily large area. Always test an ultra-fine pad first.
-
Know when to stop: Stop sanding immediately if you detect a factory fingerprint-resistant coating, if leveling the scratch would visibly warp the panel thickness, or if you are sanding into a weld or seam.
For consistent blending results, browse our surface conditioning collection and curated buffing kits.
Stainless Steel Scratch Repair FAQ
1. How do I know if my appliance has a fingerprint-resistant or clear-coat finish?
Check your owner's manual or product specifications for terms like fingerprint-resistant or protective clear coat. Visually, coated stainless steel has a slightly darker, highly uniform appearance. When you run your fingernail lightly across a coated surface, it may feel slightly softer or more uniform than bare stainless. If in doubt, test in a hidden area with water only before using any abrasive.
2. What grit should I start with for appliance scratches?
Always start with the finest abrasive possible to minimize damage to the factory grain. Use the fingernail test above to diagnose severity. For light scuffs, start with a 1000 to 2000 grit pad or a polishing compound. Only escalate to coarser grits if finer options fail after a spot test.
3. Can I use steel wool, green scouring pads, or kitchen scrubbers?
No. Avoid steel wool because it leaves carbon steel particles that will rust and contaminate your stainless steel. Standard green kitchen pads are ungraded and create random, cross-grain scratches. Use graded, purpose-built abrasives designed for stainless steel.
4. Why does my repair look shinier or duller than the rest of the panel?
This happens when the abrasive changes the surface texture or you apply too much polish. Expand your blend zone using a finer pad. Work with the grain only, use lighter pressure, and extend your feathering strokes further outward until the sheen transitions smoothly.
5. What should I do if the grain runs in different directions on my stainless steel sink?
Many stainless steel sinks feature multi-directional grain patterns, especially where flat basins meet vertical walls. Never force a single direction across these boundaries. Treat each plane as an independent surface with its own grain direction, tape it off separately, and blend accordingly.
6. When should I hire a professional or replace the panel?
DIY scratch repair works well for light to moderate scratches on uncoated stainless steel. If the scratch catches your fingernail hard, if the steel has a clear coat you cannot remove safely, or if the scratch depth would require grinding past the surface into the metal body, contact a professional fabricator or appliance repair service. The cost of a professional finish is often less than replacing a full appliance panel.
Restore Your Stainless Steel the Right Way
Removing scratches from stainless steel is a methodical process: test before you sand, match the grain direction precisely, and always work finer before coarser. The difference between a clean repair and a ruined panel comes down to patience and technique. With the right abrasives and a disciplined approach, most surface scratches are fully recoverable.
Join Our Newsletter
Sign up to get the latest on sales, new releases and more …Join Our Newsletter
Sign up to get the latest on sales, new releases and more …Shop Categories
Recent Articles
- How to Remove Scratches from Stainless Steel
- 9 Kickass Metal and Wood Home Shop Projects to Flex Your DIY Skills
- How To Cut Carbon Arrows
- How to Remove Rust from Knives: 7 Simple Methods
- How To Fix Scratches On Car Wheels
- How To Polish A Car - Step by step guide
- Stripping Wood Vs Sanding Wood
- Painting Your Car: Essential Steps, Supplies, and Pro Tips
- Build Your Own Cornhole Boards: A Step-by-Step Guide
- Headlight Restoration That Lasts: Grits, Coatings, and Real-World Durability
Featured Products
-
 746 Reviews
4-1/2" x 7/8" T29 Zirconia High Density Flap Disc - 10 pack
$25.19
-
 738 Reviews
4-1/2" x .040" x 7/8" t1 premium thin cut-off wheel - 25 pack
$20.88
-
 220 Reviews
4-1/2" x 7/8" T27 Zirconia High Density Flap Disc - 10 pack
$25.19
-
 380 Reviews
6" x .045 x 7/8" T1 Premium Thin Cut-Off Wheel - 25 pack
$27.29
-
 55 Reviews
Nonwoven 6" X 9" Scuff, Clean & Finish Hand Pads
$0.83
-
 123 Reviews
4-1/2" x 1/4" x 7/8" T27 Depressed Center Grinding Wheel - 25 pack
$28.34


Blog Categories
- Abrasives
- Sanding
- Grinding Deburring Finishing
- Safety and Cleanliness
- Metal Working
- Selecting Tools And Equipment
- Wood Working
- Art And Design
- Diy Projects
- Industry 4.0
- Buffing
- Cutting Tools
- Carbide Burrs
- PPE
- Wire Brushes
- Bonded Abrasives
- TIG Electrodes
- Wire Wheels
- Bits
- Diamond Blades
- Power Brushes
- Product Reviews
- Grinding
- Finishing
- Industrial Cleaners